This article explains how you can turn Off macOS Mojave Screenshot Preview thumbnails? If you have used the older version of macOS then you should know that whenever you took a screenshot on your MacBook your screenshot was instantly sent to the Desktop or to the default folder, but one of the new features in macOS Mojave changes this: Now, whenever you take a screenshot on macOS Mojave, it shows a floating thumbnail of your screenshot for a few seconds which slows the whole thing. If you Click on the thumbnail then you will be able to edit the image, but if you wait for a few seconds it image will save the screenshot to your desktop or default selected folder.
- Photo Editing on a Mac: Post-Processing Basics
- Creative and Eye-Catching: 25+ Free Google Docs Templates for Flyers and Brochures
- 9 Best iPhone Gaming Apps in 2023
- 9 Tips to Remember to Increase Your Safety on Telegram
- Geo-Blocking and Why You Would Want to Bypass It
Simple advice that will help speed up the work.
The latest version of macOS is Mojave, and it changes how screenshots work. The screenshot app in Mojave macOS adds a floating thumbnail preview of the captured screenshot in the bottom-right corner that shows up before the file shows up on your desktop thus slowing the process. I easily get irritated with it because, I want to open the screenshot file in order to edit it with preview app, which has more editing features.
This isn’t a bad feature, but if you want to change these screenshot feature settings then please follow the below instructions, it’s easy to change.
If you follow this article where we’ve shown you how to take a screenshot on a Mac. The most common method is Command-Shift-4 —it allows you to take a screenshot of any section of the screen.
Along with “Screenshot” in the updated applications macOS Mojave now has a screenshot thumbnails that appear at the edges of the screen. With small preview you can interact: immediately open a screenshot for editing or drag the window of any applications for further work.
In theory it sounds very easy, but in reality it’s not that cool. Firstly, not all applications support this import. For example, Mail, and Pixelmator understand what you want to do, and Chrome and Evernote flatly refuse. Secondly, these miniatures are added delay before screenshot preservation: after swipe thumbnails runs about 1-2 seconds before the picture appears on the desktop.
Hide or Turn Off Mojave Screenshot Previews
If you’re tired of this order, there is a simple way to fix it.
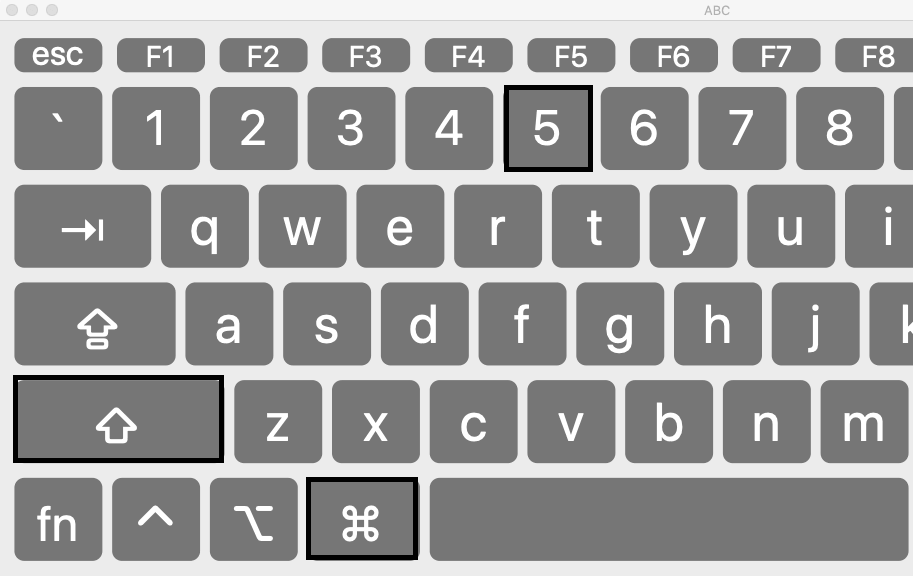
STEP 1: Shift + Command + 5

From a Mac running at least macOS 10.14 Mojave, Run the utility screenshots by pressing Shift + Command + 5.
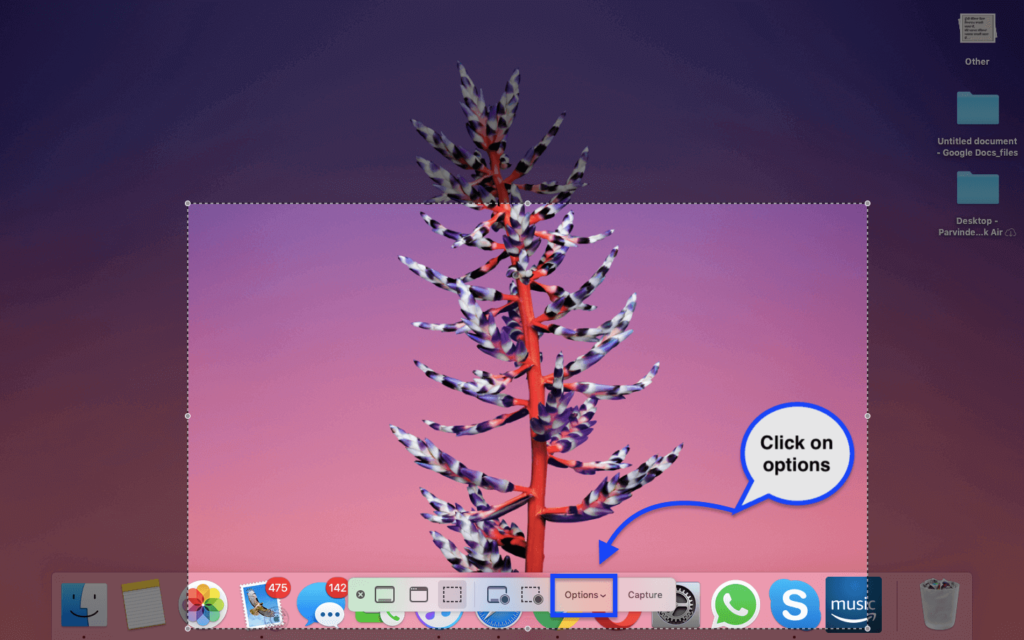
STEP 2: Open “options”

Now after opening Screenshot utility, you will see toolbar icons at the bottom of your MacBook screen, from the toolbar select menu “Options“
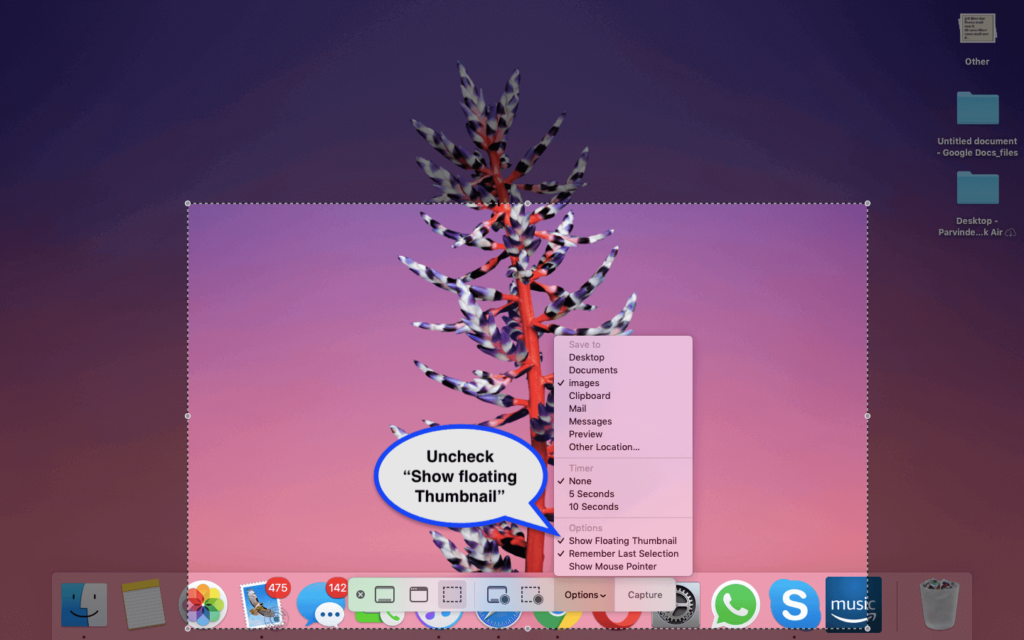
STEP 3: Disable floating option

After clicking on options menu a new window will open, then Uncheck “Show floating thumbnail“. Done!
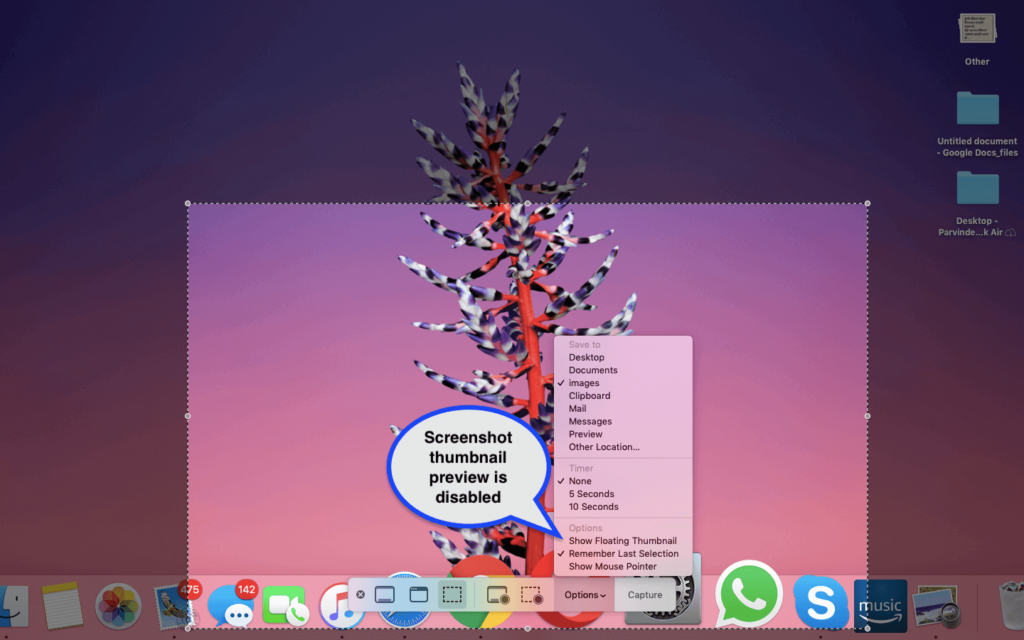
STEP 4: Screenshot thumbnail preview is disabled

From that moment, just screenshots will be saved to the desktop (or another specified folder), same as the macOS High Sierra and earlier versions of the system.
Now you can close the Screenshot utility settings and take a new screenshot. From now on, your Mac screenshot will be immediately saved to the desired folder without any delay.
If you want to edit your screenshots, then you can always open your screenshot with the preview app, which has more features to edit an image.
The above article provides detailed instructions for how you can turn Off macOS Mojave Screenshot Preview Thumbnails explained with images. If you are still facing any problems regarding how to disable macOS screenshot thumbnail previews then please leave us a comment and we will try to solve it for you.
Now, this is it for Hide or Turn Off Mojave Screenshot Previews
