MacBook camera not working? This guide shows Why and how you can fix the Mac camera not working issues. If you have similar problems as below, then you will need to read this article all the way through. When there is no camera found on your MacBook, it might be because of various reasons which we will discuss below. Since each situation varies slightly, we’ll walk through some possible solutions for common issues below. Keep in mind that you may need to try more than one solution before everything works normally again. And remember: if you’re still having issues after trying these tips, please contact Apple Support.
8 Easy steps to fix the Mac camera not working issue:
- Restart your Mac
- Check MacBook camera indicator light
- Update your MacBook Air or Pro
- Check Screen Time settings
- Allow apps to access Camera
- Reset the SMC
- Run Apple Diagnostics
- Check Camera System Report
- Reinstall/ Update the App
In the event that your built-in camera is not working on your MacBook, you will need to complete a few steps in order to troubleshoot the issue. Luckily, you can resolve most common issues if you’re able to diagnose the problem correctly. If you’re having trouble using your built-in camera, then read through the steps below to learn how to troubleshoot it.
Your Mac laptop or iMac desktop is a great work companion. It’s portable, offers many applications at your fingertips, and lets you connect with colleagues with simple video or audio calls. But if there’s one thing that can disrupt all of this, it’s the webcam. If your MacBook camera fails to work, you are stuck without visual communication capabilities on your laptop. This can be a pain if you need to make an impromptu call or a video testimonial for a colleague.
If you are using a MacBook, there are two ways your camera can go haywire. First, the camera could stop working altogether which makes the FaceTime or video call impossible. Second, the camera might appear unavailable when attempting to activate it.
I’m going to show you how to troubleshoot MacBook built-in camera not working issue.
➡ Restart your Mac or MacBook pro
Restarting your Mac can solve issues with your webcam.
- In Mac OS, go to the Apple logo at the top left and choose “Restart.”
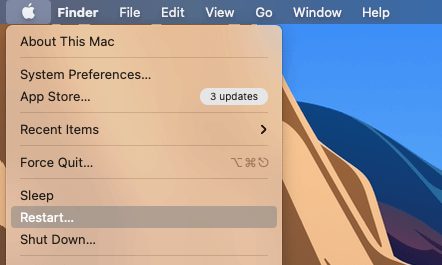
You can also restart MacBook in Safe Mode:
- Choose Apple menu > Shut Down
- Wait for wait 10 seconds.
- Restart your Mac and immediately press and hold the Shift key.
- Release Shift key when the apple logo appears.
Fix “There is no connected camera” in FaceTime
- Open Terminal
- Enter command: sudo killall VDCAssistant and sudo killall AppleCameraAssistant
- Press enter and enter password.
If the camera still does not work, follow the below steps to fix the camera.
➡ Check MacBook camera indicator light
A common point of frustration is a blinking green light on your Mac’s front camera. This means your Mac’s camera is working but you can’t do anything with it. You should contact Apple at this point.
➡ Update your MacBook Air or Pro
MacBook camera not working? You may need to install the latest version of macOS on your Mac.
To Update Mac: Open System Preferences → Software Updates.
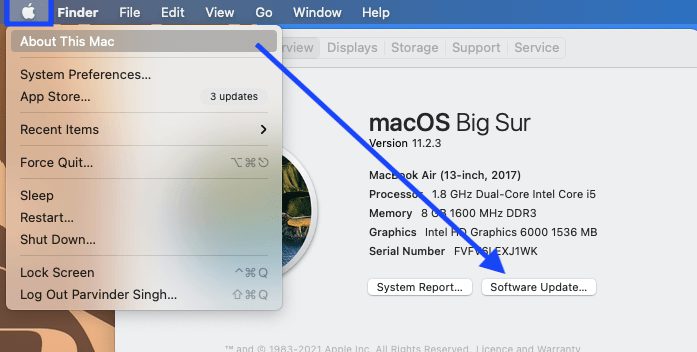
For some users, the camera may not be functioning as intended. If this is a problem for you, please try updating to the latest version of macOS from Apple. Updates may include better support for third-party cameras and software, as well as bug fixes for your device that impact image quality.
➡ Check Screen Time settings & Camera Restrictions
If you can’t turn on your MacBook camera it might be that you have turned off the camera functionality completely in Screen Time. To check whether the screen time is limiting access to MacBook camera:
- Go to Apple menu > System Preferences, click Screen Time.
- Click on Content & Privacy in the left side, then click Apps.
- Make sure that camera is allowed, as shown in the below screenshot.
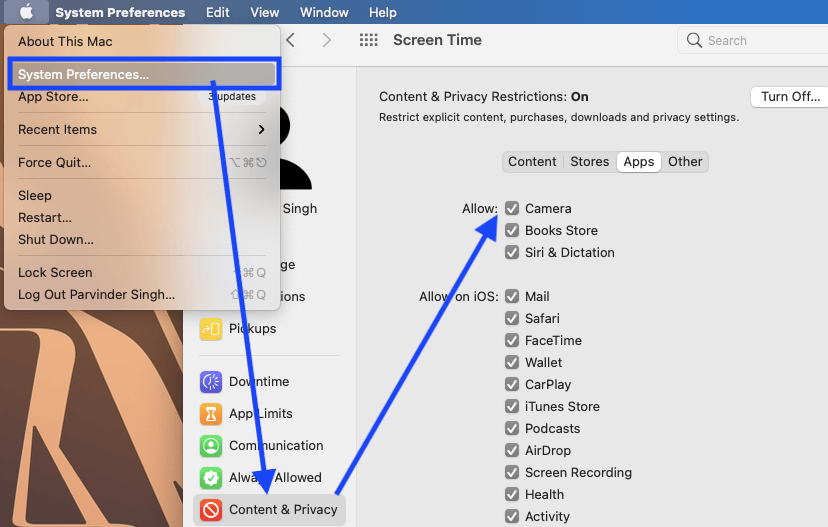
If you’re having issues with your MacBook camera not working when using Screen Time, try turning off the camera restrictions via Screen Time. If you turn off camera restrictions via Screen Time, your MacBook camera functionality will be restored automatically when you next log in to your Mac.
➡ Allow apps to access Camera
To use your built-in camera, some apps require that you allow them to access the feature. If an app isn’t working correctly, see App permissions Under security and Privacy.
Choose which apps can use your Mac’s built-in camera in:
- Apple menu > System Preferences > Security & Privacy > Privacy tab
- Now click on Camera in the left sidebar.
- Allow the app access to Macs’ Camera.
- Then open the app and test if camera is working or not.
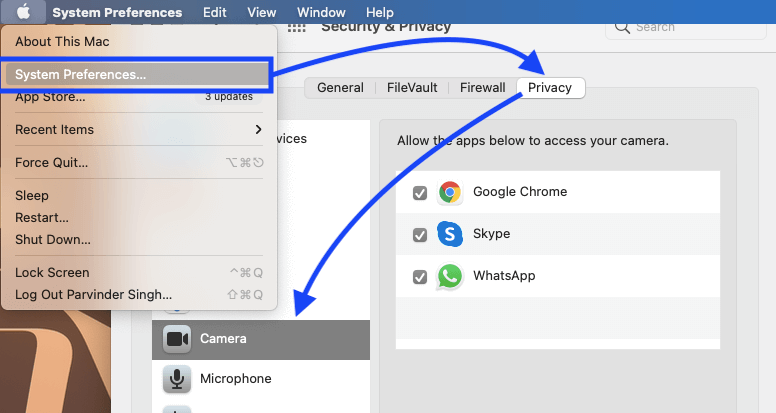
Do this only for apps that you trust, because giving too many permissions will make your Mac vulnerable to attack.
To use your camera app, make sure that it isn’t blocked by another application. If you are using FaceTime, try using your camera outside of FaceTime. If this doesn’t resolve the issue, please contact Apple Support.
➡ Reset the SMC
The built-in camera on Macs with Intel processors is known to have problems with Camera not working, focusing, white balance, and exposure. This can make taking photos difficult, especially in low light. Resetting the SMC (System Management Controller) usually helps fix these issues.
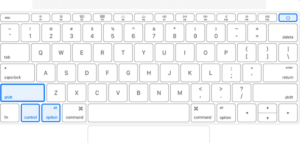
To reset the SMC: Shut down your computer. Unplug the power cord and plug it back in after a few seconds. Press and hold the Shift + Control + Option keys then press and hold the power button as well. Keep holding all four keys for 7-10 seconds.
➡ Run Apple Diagnostics
If the camera on your Mac doesn’t seem to be working, you may need to talk to run Apple Diagnostics. Doing this will launch Apple Diagnostics and you should see a text box appear that says “Errors.” In this box, look for any error codes beginning with N. If any are found, contact Apple Support and mention the error code to them. Check Apple diagnostics.
➡ Check Camera System Report
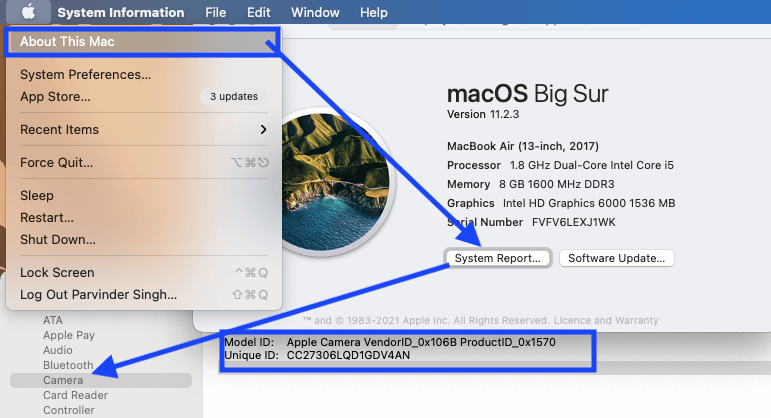
- Apple menu > About This Mac → System Report.
- Click Camera from the left pane
- If you don’t see the Camera details, contact Apple Support
➡ Reinstall/ Update the App
Many older apps don’t play nicely with the permissions system Apple includes in newer versions of macOS. Try deleting the app from your “Applications” folder and Reinstalling the app may solve the problem.
There are many reasons why a program might not work with your camera. First, try reinstalling the app. If that doesn’t solve the problem, try updating it for better compatibility.
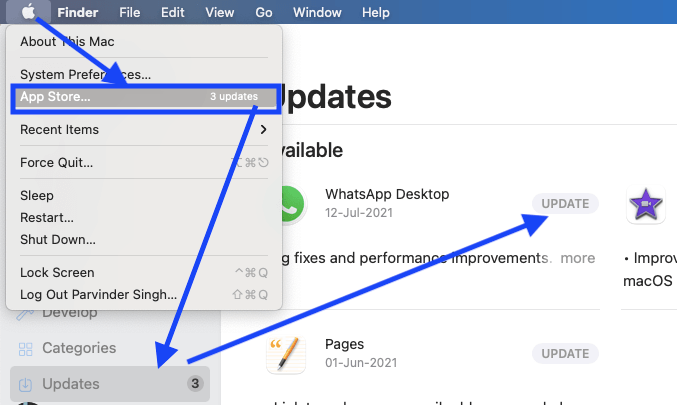
You can update apps from the App Store under Updates section on the left sidebar. Look for an Update button in-front of the app, and click “Update” to apply them.
Wrapping Up
Whether for snapping photographs, recording a movie, or making video calls, our cameras play a big role in how we define and share our visual relationships. The challenge is that if you own a MacBook you are bound to run into some of its technical problems at some point. Be it due to software failure or hardware malfunction, your built-in Macbook camera might stop working suddenly. Thankfully, this article covers all the possible fixes that can help you get your MacBook built in camera working again.
