Want to save a part of the Mac screen as an image? In other words, want to take a screenshot of your Mac screen for some project or just want to save some data that you can look at afterwards?
It is very easy to take a screenshot on your iMac, MacBook Air or MacBook Pro. And, there are many ways to complete this task.
Taking a screenshot is very easy on a Mac and you don’t need to invest in software software. You do need to know the correct keyboard shortcuts for an immediate capture. So if you want to learn how to take a screenshot on a Mac, you’ve come to the right place.
If you want to learn how to take a screenshot on a Mac, whether it be for work or for fun, there are multiple ways to do so. One of the most popular is using Apple’s native screenshot tool, which has been steadily improving over the past several years. While the method I’m going to show you will work on just about any Mac laptop or desktop computer, version OS Big Sur introduced some cool new features that I’d like to show you.
Taking a screenshot of your Mac is pretty simple. There are keyboard shortcuts that you can use on your new Mac or you can use free third-party tools to allow for more features. These features will help you create pictures of the screen of your Mac in more ways than just standard shot.
Whenever you take a screenshot on your macOS system, it gets saved in .png format and the screenshot file will be saved in the default folder but you can always change the screenshot file location from the screenshot tool options.
So, the two main methods which you can use to take a screenshot on mac are:
- Using the screenshot tool pane
- Using the keyboard shortcut method which i mostly use
The keyboard shortcut method is fast and is very handy when you need the screenshot fast and don’t want to slow down the process by using the Screenshot tool.
Both Screenshot methods are quite the same but one is 2-3 seconds faster than the other one.
I mostly use Mac screenshots for my Websites and I also take screenshots of important web documents, like: When I want to save my Crypto Currency profits, I always take a Screenshot of my account for later use.
The MacBook Screenshot tool — Screenshot — lets you capture entire screens, windows, and sections of your screen (screenshot), and then organize and edit (image editing) the screenshots you’ve captured.
Screenshots are actually very helpful in saving the data within no time, because sometimes you don’t have enough time to take notes. So, I use the screenshot functionality of my Mac daily.
You can also record the Mac screen using this screenshot method. If you want to create tutorials for your youtube channel or share any coding project with school teachers or work colleagues, you can always use the screen recording feature of your Mac.
You can also turn on or off screenshot floating option .
Just follow the below guide and you’ll find how to take a screenshot on a Mac easily(and screen recording or capturing video)?
- You can take a screenshot on your iMac, MacBook Air or MacBook Pro computer using different methods.
- You can also edit the screenshot file after taking the screenshot and then save it with a different name.
- You can either use your Mac Touchpad/Keyboard or the mouse for taking a screenshot on Mac.
Taking a screenshot on the Mac is very easy once you know how. This themacios guide teaches you how to take a screenshot on your MacBook or iMac computer, using either the onboard keyboard controls or the QuickTime app — which should be available on your Mac if it isn’t already installed.
Screenshot on MacBook Air and MacBook Pro
You can crop a screenshot on mac from a specific area or the whole window or the complete screen. If there are multiple windows open on your Mac screen then you can also crop a screenshot from a specific window pane and save it on the Mac.
The below method of taking screenshot or capturing and cropping Mac screen Works on MacBook Air, MacBook Pro and iMac. Also if you are using macOS Big Sur, macOS catalina, macOS High Sierra, macOS mojave, you can use this screenshot method with small tweaks.
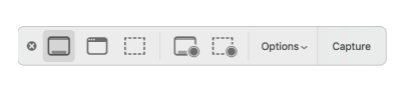
When you open the screenshot panel, it will show you a panel of cropping, screenshot and screen recording tools, you can use these screenshot tools to set the size and you can even set the delay timer for screenshots.
The MacBook Air and the MacBook Pro have identical operating systems. This means that they operate in basically the same way, have the same layout and both take screenshots in the same way. Both computers follow a similar procedure to take a screenshot:
Step 1: How To Take a Screenshot on Mac
Open Screenshot Panel
You have to press these buttons on your Mac keyboard, Shift-Command-5 or you can also use the Launchpad to open the Screenshot app or Open Screenshot from the Finder applications folder.

Step 2: How To Take a Screenshot on Mac
Select the Screenshot tools
Now you will see three options for taking a Screenshot on Mac computer:
Capture the entire screen, Capture a window, capture a portion of the screen.
And two options for recording the Mac Screen
Record the entire screen and Record a portion of the screen
Step 3: How To Take a Screenshot on Mac
Choose a option to Crop Screen
Now you can choose from any of the Screenshot available sizes.
If you choose the:
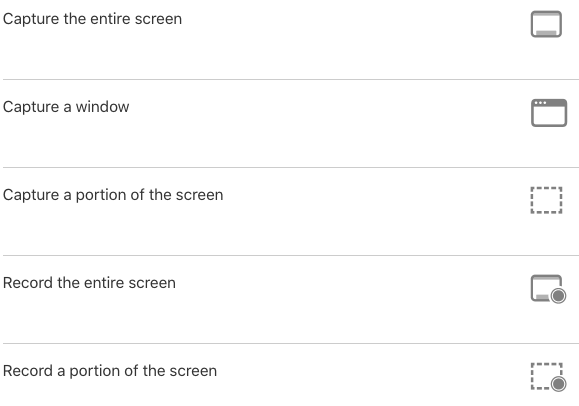
Capture the entire screen: It will capture and take the screenshot of Complete MacBook Air or MacBook Pro Screen
Capture a window: This option will Screenshot s single window pane that you will select.
Capture a portion of the screen: This screenshot option is more flexible and let’s you select the area of the Mac screen and can also be used in corners or can also be used to take screenshots of Menus on mac.
Step 4: How To Take a Screenshot on Mac
Edit and save Screenshot on Mac
When a screenshot is taken on Mac or a screen recording is taken, you can always edit it using the default Mac preview app or Quicktime play for cutting and cropping Media .
Where do screenshots go on mac
By default, mac saves the Screenshot to your Desktop with the default name as Screenshot.
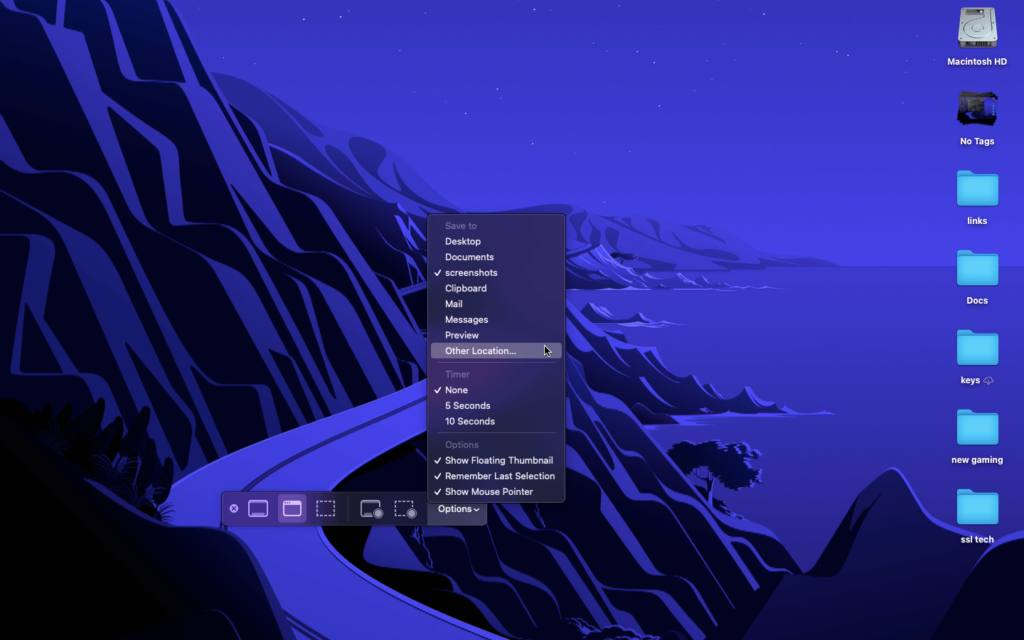
But, you can always change the mac screenshot folder to your preference and save the screenshot files to that folder.
To save Mac Screenshots to new folder:
Open Screenshot app using Shift-Command-5 and then click on Options
Now Under Save to click on other folders and then create a folder.
From now on Mac screenshot or screen recording will be saved under this folder.
Also read: How to reset a mac
Keyboard Shortcuts to Capture a ScreenShot on macOS
The One method Which I use to Capture a screenshot on My macBook Air or Pro is: Keyboard shortcuts.
So, I use the Inbuilt Keyboard Shortcut feature to take a screenshot on Mac fast.
To do this, you have to set up the Screenshots shortcut under the Mac Keyboard settings.
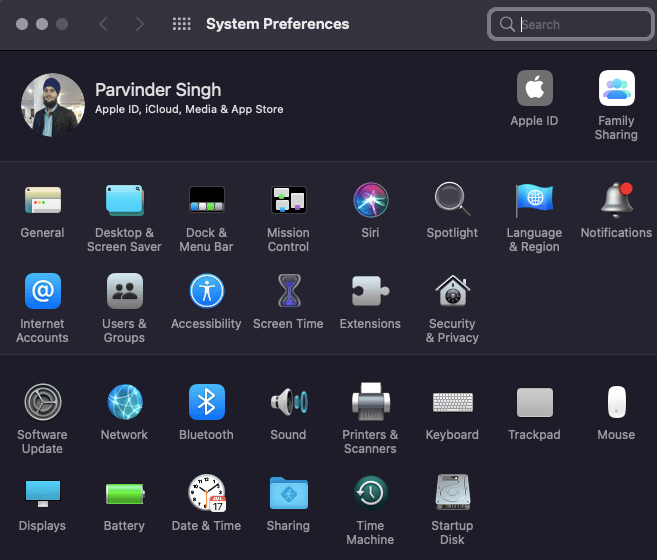
Go to> System Preferences and then Open Keybaord and then click on Shortcuts tab.
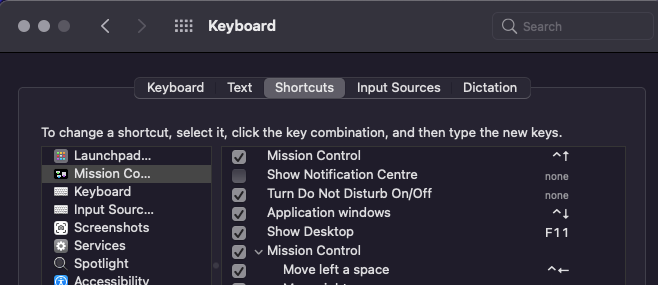
On the left side Click on Screenshots
Now Select “Save picture of screen as a file” and then tap on the right side…
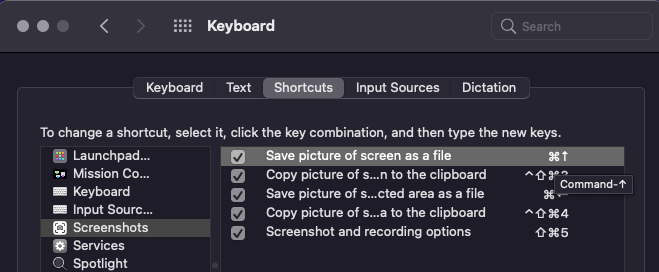
Now you have to choose and set two key combinations for this shortcut.
I Use Command and < key for this (First press command key and then <)
For the second Screenshot shortcut
I Use Command and ^ key
You can always use other key combinations to take a screenshot. And now whenever you press these keys simultaneously, a screenshot of the mac will be taken and the file will be saved under the select location.
To capture the entire screen, press Command-Shift-3. Mac screenshot will be saved as a PNG file on your MacBook.
Portion of the screen:
To capture a portion of the screen, press Command-Shift-4. A cross-hair cursor will appear and you can click and drag to select the area you wish to capture.
Specific application window:
To capture a specific application window, press and hold Command-Shift-4 then tap on the Spacebar.
Some thoughts on Screenshot tool
Capturing a screenshot on a Mac is as easy as taking a screenshot of a specific portion of the screen. Whether you want to grab a screenshot of something on your screen, the entire screen, or even a picture from within another app, it can be done quite quickly and easily through macOS and its included apps.
There are a ton of tools on the Internet these days for taking screenshots on a Mac. Especially if you have used a Mac or have been around computers for quite some time you have seen some progress from these tools over the years.
There was a day when I had to take a smoke break just to crop my screenshot and then share it. That is not the case anymore. Now there are programs that can do all that in just a couple of clicks while also saving space on your computer, prices that won’t break your laptop and developers that made their tools very approachable.
- Using the built-in screenshot functionality of macOS Mojave, Big Sur and later, you can capture pictures of the entire screen, the selected portion of the screen, or just a window. You can also set a timer to have these pictures taken automatically after a designated amount of time.
You can take photos on your Mac fairly easily. If you’d like to take a screenshot of a specific item, window, or even your entire screen, you can do that too.
Also read: Mac Recovery Mode